Overall the group and myself are over the moon with how the animation turned out. We have put so much hard work in over the semester individually and I believe it really shows in the final animation. I think we have all learnt that lighting and textures play a massive part in the animation, especially as we were trying to create life like, beautiful scenes.
I can't really think of too many things that I would have done differently or that I am not very proud of. If anything, I think maybe we could have experimented with different transitions and the order of the clips, but this really is just a minor clip. I would love to carry on with this and begin to broadedn each scene with more animating and more things happening.
I think it was a wise choice to steer clear of characters as making a realistic person takes a huge amount of time, this is time that we didn't have.
I modelled both pier scenes, highlands house and the station scene. The station scene was rather last minute, but I'm so glad I managed to finish it as I think it turned dout very well. I am most proud of this piece.
I really enjoyed working in a group as we could all bounce ideas off of each other to get the best. It also helped that we could concentrate individually on each scene and really spend some time getting it to look good. Eveyrone completed their scenes to a very high standard and they all blend in as well as each other.
I really improved my skills during this project and I also learnt some new skills. I have learnt how to create a realistic spotlight, by adjusting colour, coning and feathering. I learnt that grabbing the viewers attention is one thing, but holding it througout the animation is another. Ours was perhaps one of the shortest animations, but I really think it had the best impact. Each scene was a maximum of 10 seconds long as not to bore the audience. This was done on purpose.
I think as a group we met the brief by creating a high quality animation that will show off the beauty of essex and all the exciting attractions and encourage tourism in the county. We wanted to show that Essex is a promising place for all age ranges and ethnicities and I believe we did that.
We all look foward to seeing it on the visit essex website.
Thursday, 9 December 2010
Final Video...
The final video was exported in F4-LV in 720 HD. We had a few issues to start with for example the video was jerky when it played back. We tried alot of different settings for this and managed to fix it to give a high quality, smooth animation.
The animation is here to see....http://www.youtube.com/watch?v=e5_VEc5VGu4
The animation is here to see....http://www.youtube.com/watch?v=e5_VEc5VGu4
Video editing software...
All the group had compiled 15 clips each. We now had the task of importing them into Adobe Premier, a programme in which we had little knowledge. As there was only going to be the one final animation, we had to work as a team and put of our ideas together, such as order of clips, text, font, transitions and other various features.
The programme is fairly self explanatory and easy to pick up. We had to import the files, click and drag to the time line, adjust the length and speed of the clip and render it. We went for fade trasitions between clips as this is a professional looking way of joining seperate videos.
The next thing we had to choose was the theme song, A few of hours spent a long time searching the internet for suitable soundtracks, We wanted something that had no words and was both calm, yet exciting. A perfect way to describe Essex. The song we chose was calm toward the beginning, but as the video went on and the activities became more exciting, a beat kicked in. I think this worked very well. The track was adjusted and moved so that it would fit in with the clips and fade out perfectly at the end.
Rendering...
Now i had completed all modelling, animated each scene and set up the lighting and was happy, I could begin to render each clip. We Wanted to have an amazing quality video so chose HD. We went for 1280x720 which is perfect for common computer screens (where it will be commonly veiwed) and still keeps the rendering time slightly less. Once we were happy with the render settings we began to render. I was very surprised at how long each render took. The scenes that featured water took upto 9 hours to render a 6 second clip!
Lighting of Hylands house....
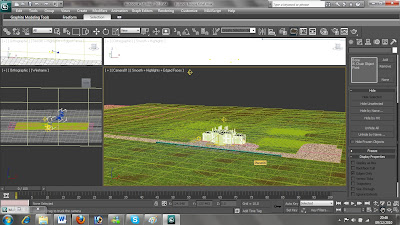
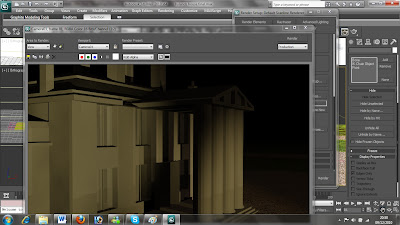
Now I can concentrate on applying some lights to achieve the spot lit effect. I started by apply 2 very dim omnis above the house to light the scene up slightly so the veiwer can see whats going on. Now I can add 3 spotlights, positioned on the ground to light up the building. I have coloured them so it gives a true incandescent effect.
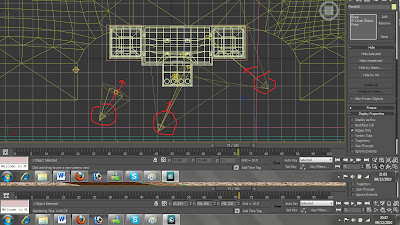
The screenshot shows where lights are pointing and how wide the beam is. I am veyr happy with how this turned out. The spotlights create some atmospheric shadows and make the house looks very grand and tall, exactly the look I wanted to create. Here is a final image taken straight from the video:
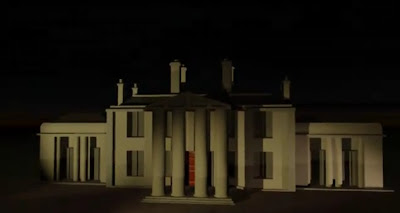

The screenshot shows where lights are pointing and how wide the beam is. I am veyr happy with how this turned out. The spotlights create some atmospheric shadows and make the house looks very grand and tall, exactly the look I wanted to create. Here is a final image taken straight from the video:

Modelling Hylands house....
Now I had a few reference photos I could being to start modelling. As always I began with the maing feature in the scene. This time the house would be first.
I started to model half of it using a rectangle and extruding, insetting and chamfering polys and edges.
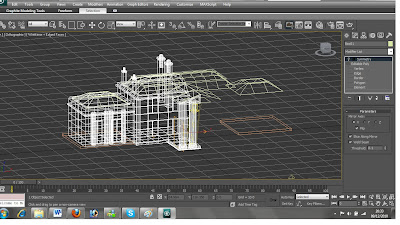
I could now use the symmetry tool to mirror the other side of the house. I have to open up the editor and adjust which axis I want to mirror along and then move the mirror.
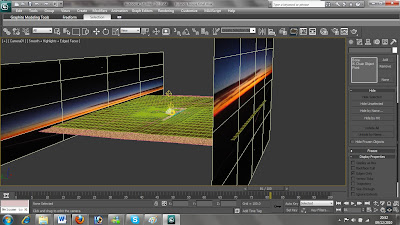
I could now create the ground that it would sit on. The house sits along a gravel driveway with grass infront and behind it. I did this the same way as in the models before, by creating a thin box and adding a material to it. A bump was added with the same bitmap to give a realistic bump for both the gravel and the grass.
I also added a smoke bump to the gravel to make it a bit more realistic.
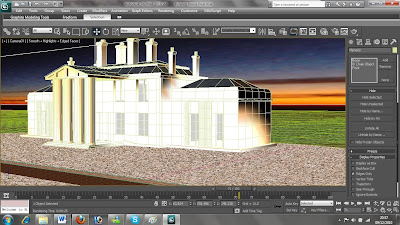
The next job was to add a material to the house. The hardest part was getting the windows to look realistic. I wanted them to be dark yet still reflect the surroundings. I decided to add a ray trace reflection to them and tint it slighlty so it reflected much darker than the surroundings.
As it reflected it showed that there was nothing opposite the house as this was out of shot. I added another 2 more planes, one behind the house, one infront, and assigned another sunset scene to them so it appeared that the windows were reflecting the opposite horizon too.
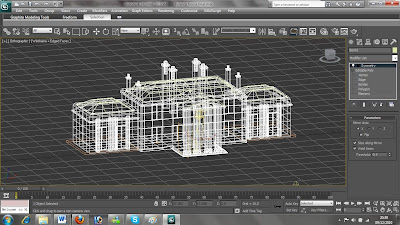
I am pleased at how this turned out. This was the modelling complete.
I started to model half of it using a rectangle and extruding, insetting and chamfering polys and edges.

I could now use the symmetry tool to mirror the other side of the house. I have to open up the editor and adjust which axis I want to mirror along and then move the mirror.

I could now create the ground that it would sit on. The house sits along a gravel driveway with grass infront and behind it. I did this the same way as in the models before, by creating a thin box and adding a material to it. A bump was added with the same bitmap to give a realistic bump for both the gravel and the grass.

I also added a smoke bump to the gravel to make it a bit more realistic.
The next job was to add a material to the house. The hardest part was getting the windows to look realistic. I wanted them to be dark yet still reflect the surroundings. I decided to add a ray trace reflection to them and tint it slighlty so it reflected much darker than the surroundings.

As it reflected it showed that there was nothing opposite the house as this was out of shot. I added another 2 more planes, one behind the house, one infront, and assigned another sunset scene to them so it appeared that the windows were reflecting the opposite horizon too.

I am pleased at how this turned out. This was the modelling complete.

Hylands house...
I chose to model Hylands house as it is situated in Hylands park, home of the V-festival! This attracts people to the park and shows how diverse the park, and the county, is. Not only is it a very lively, popular home to one of the worlds largest music festivals, but it is also home to a 300 year historic house. This attracts a wide range of people in their tens of thousands every year!
I wanted to model Hylands house at night as it looks so spectacular and grand with the spotlights shining on the white paint work at night.

I wanted to model Hylands house at night as it looks so spectacular and grand with the spotlights shining on the white paint work at night.
Subscribe to:
Comments (Atom)